
The good point is that, unlike any software, it is not free from mistakes either. One of the errors that users often face is the message Error H202. This error commonly appears when the user attempts to open a QuickBooks company file on another computer, but QuickBooks is unable to link with the computer server. This blog post will examine the possible reasons for QuickBooks Error H202 mentioning several steps to help get it resolved.
What is QuickBooks Error H202?
Error H202 occurs when QuickBooks cannot connect to the company file. This usually happens in a multi-user setup. When you try to open a company file that is stored on another computer, QuickBooks needs to connect to the server. If it fails to do so, it shows Error H202.
Potential Causes/Reasons of Error Code H202
1. Incorrect hosting configuration: The problem could be QuickBooks being set up incorrectly in a way that does not allow for multi-users.
2. Firewall settings: Firewall settings configured on both the server and the workstation may prevent communication between QuickBooks and the server.
3. DNS settings: A problem with the DNS settings may be blocking QuickBooks from translating the server’s IP address into a domain name.
4. Network connectivity problems: The malfunctioning of network networks, specifically a slow or unstable network connection, also triggers Error H202.
Having talked a bit about possible causes of Error H202, let’s go further into a repair of it.
How to Fix QuickBooks Error H202
Error H202 in QuickBooks may be very annoying, but there are different ways you can fix it. In this section, we’ll explore two approaches: resorting to the tools available in the QuickBooks Tools Hub and fixing the error manually.
Method 1: Launch the QuickBooks Database Manager in your server using the QuickBooks Tool Hub Console.
Step 1: Download and install the QuickBooks Tools Hub on your server to upgrade it.

1. Visit the official Intuit website: After that, browse the Intuit site and download the QuickBooks Tools Hub. Be careful when downloading tools from unknown sources so that your security is not compromised.
2. Download the QuickBooks Tools Hub: Go to the website and click the link to download QuickBooks Tools Hub. To begin the download, just click on it.
3. Install the Tools Hub on your server: To initiate the installation process, find the downloaded file and double-click on it. The installation will begin then. On the screen, follow the instructions for installing the Tools Hub server.
Step 2: From the Tool Hub, start the QuickBooks Database Server Manager on your server device.
1. Open the QuickBooks Tools Hub: Double-click on the QuickBooks Tools Hub icon on your desktop or in your Start menu to start the program.
2. Navigate to the “Network Issues” tab: In the QuickBooks Tools Hub, there are many tabs and here you will find a variety of tools. Select the “Network Problems” tab and the available tools concerning network connectivity issues will become available.
3. Run QuickBooks Database Server Manager: Find the QuickBooks Database Server Manager icon, and then click on it. This tool will help you scan and repair your business files for any problems with Error H202.
4. Follow the prompts: After you have chosen the QuickBooks Database Server Manager, you are supposed to carry out a scan of your company files, detect the problems, and fix them by following on-screen instructions.
Step 3: From the toolbar, select File Doctor.
1. Nevertheless, stay in the QuickBooks Toolbox: Change to the “Company File Issues” tab. This drawer is home to a set of widgets that provide diagnosis and repair for the company data issues.
2. Select “Run QuickBooks File Doctor”: Click on the localized icon “QuickBooks File Doctor” to commence the review of all possible file-related issues and any attempted fixes.
3. Follow the instructions: Once you´ve initiated the File Doctor tool, then follow the step-by-step instructions displayed on the screen. The tool will lead you step by step through to diagnosis and troubleshooting of Error H202 and will effectively resolve it.
Method 2: The manual fixing of the spelling error H202
You may, also, follow the manual approach which can be helpful, especially when using the QB Tools Hub doesn’t help solve the anxiety error.
Solution 1: Also recall all the services on your server.

1. Use your keyboard shortcut `Win + R` to launch the Run dialog box.
2. input “services.msc” and press “Enter” and the Services Window will pop.
3. Find a service titled QuickBooksDBXX and QuickBooksXXX where the latter indicates the version of QuickBooks that you are using.
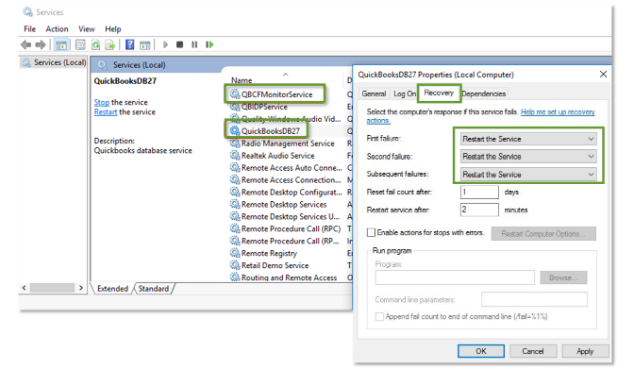
4. Verify that these are set up and coming on automatically. If not, perform that action, right-click on each service, choose the Properties, and then set the Startup type to Automatic.
Solution 2: Sync the rules with your Windows admin group on the server once they are ready.
1. Output: Go to Control Panel > Administrative Tools > Computer Management.
2. In the Local Users window, open to Local Users and Groups > Groups.
3. By double-clicking on the Administrators group you will open its properties.
4. Just hit the “Add” button and type the QuickBooks services names (QuickBooksDBXX and QuickBooks) into the Administrators group box.
Solution 3: Define your firewall settings on your server accordingly.
1. Go to the firewall settings in the control panel or settings app.
2. Make sure that the application is available through both inbound and outbound rules.
3. Provide for QuickBooks process and port exceptions in your firewall settings (usually 8019, 56728, and 55378 are the ones) for seamless communication.
Solution 4: Try pinging your application from a workstation.
1. Open the Command Prompt by taking the “cmd” from the start menu to the workstation.
2. Open the Command Prompt window and type “ping[server name]” (Instead of [server name], type the name of your server) and press Enter.
3. If the ping through is successful and the workstation starts receiving responses from the server, it means that there are no connection issues between the workstation and the server.
The purpose of this post is to shed light on possible causes of the error H202 and to suggest what should be done to fix it. Be it through these QuickBooks Database Server Manager that should be run from QuickBooks Tool Hub or simply by checking and configuring settings manually, these steps are meant to have your QuickBooks up and running again smoothly.
Conclusion
QuickBooks Error H202 can be frustrating. However, following these steps can help you fix it. First, check your network connection. Use QuickBooks File Doctor to identify and resolve issues. Ensure your hosting settings are correct. Configure your firewall to allow QuickBooks. Check and fix any DNS issues. Finally, rename the.ND file if needed.
By following these steps, you can resolve QuickBooks Error H202 and get back to managing your finances without interruptions. Remember, if these steps do not work, you can always seek help from QuickBooks support. They can provide additional assistance to resolve the error. Happy accounting!
Frequently Asked Questions (FAQs) About QuickBooks Error H202
What is QuickBooks Error H202?
QuickBooks Error H202 occurs when QuickBooks Desktop tries to establish a connection to the company file but cannot communicate with the server. This is common in multi-user setups where the company file is hosted on a different computer.
What are the common causes of Error H202?
Common causes include:
- Network Issues: Unstable or poor network connections.
- Incorrect Hosting Configuration: Wrong multi-user setup settings.
- Firewall Settings: Firewall blocking QuickBooks from accessing the server.
- DNS Server Issues: Problems with the DNS server.
- Damaged.ND File: A corrupted Network Data file.
How can I check if my network is causing Error H202?
To check network connectivity:
- Open Command Prompt.
- Type ping [server name] and press Enter.
- If you receive replies, your network connection is fine. If not, there is a network issue.
How do I use QuickBooks File Doctor to fix Error H202?
To use QuickBooks File Doctor:
- Download and install QuickBooks Tool Hub from the official QuickBooks website.
- Open QuickBooks Tool Hub and select Company File Issues.
- Click on Run QuickBooks File Doctor.
- Select your company file and click Check your File.
- Follow the on-screen instructions.
How do I check and configure hosting settings for QuickBooks?
On the server:
- Open QuickBooks.
- Go to File> Utilities.
- Ensure Host Multi-User Access is checked. If it says Stop Hosting Multi-User Access, click on it.
On workstations:
- Open QuickBooks.
- Go to File> Utilities.
- Ensure Stop Hosting Multi-User Access is checked. If it says Host Multi-User Access, do not click on it.
How can I configure my firewall to allow QuickBooks?
To configure firewall settings:
- Go to Control Panel > System and Security > Windows Firewall.
- Click on Advanced Settings.
- Select Inbound Rules, then New Rule.
- Choose Program and click Next.
- Select This Program Path and browse to find QuickBooks.
- Click Next and ensure That the Connection is selected.
- Follow the prompts to complete the rule setup.
- Repeat these steps for Outbound Rules.
How do I flush DNS to fix Error H202?
To flush DNS:
- Open Command Prompt.
- Type ipconfig /flushdns and press Enter.
- This clears the DNS cache, which might be causing the issue.
How do I edit the host’s File to fix DNS issues?
To edit the host File:
- Navigate to C:\Windows\System32\Drivers\Etc.
- Open the host’s File with Notepad.
- Add the server’s IP address and name at the bottom of the File.
- Save and close the File.
What should I do if the? Is the ND file damaged?
To rename the.ND file:
- Go to the folder where your company file is stored.
- Find the.ND file.
- Right-click on the.ND file and select Rename.
- Add .old to the end of the file name.
- This forces QuickBooks to create a new.ND file.
What if these steps do not resolve QuickBooks Error H202?
If these steps do not resolve the error:
- Restart your computer and try again.
- Ensure all QuickBooks updates are installed.
- If the error persists, contact QuickBooks support for additional assistance.